The four Ball wear tester consists of four balls arranged in the form of an equilateral tetrahedron. The basic elements are the three lower balls held immovable in a clamp to form a cradle in which a fourth ball, or upper ball, is caused to rotate about a vertical axis under prescribed conditions of load and speed. The balls are usually steel but a disc adapter is furnished for making measurements of other materials.
The points of contact are lubricated by immersion in the cup surrounding the four ball assembly. During the test, circular scars are worn on the surface of the three stationary balls or discs. The average diameter of the scars, which is he measure of wear, depends upon the load, speed, time of test and character of quality of the lubricant.
Procedure:
The friction wear test is conducted by placing 10 ml of lubricant sample in the ball spot. A speed of1800 rpm is used although 1200 rpm of 800 rpm can be obtained by the machine. The temperature controlled is set at 130 Degree F to simulate operating conditions although the range of the apparatus is 86 Degree F to 465 Degree F. The possible loading range for the instrument is 0.1 kg to 50 kg, the loading being verified for each test.
The coefficient of friction is taken after the first minute of operation and the wear reading after one hour.
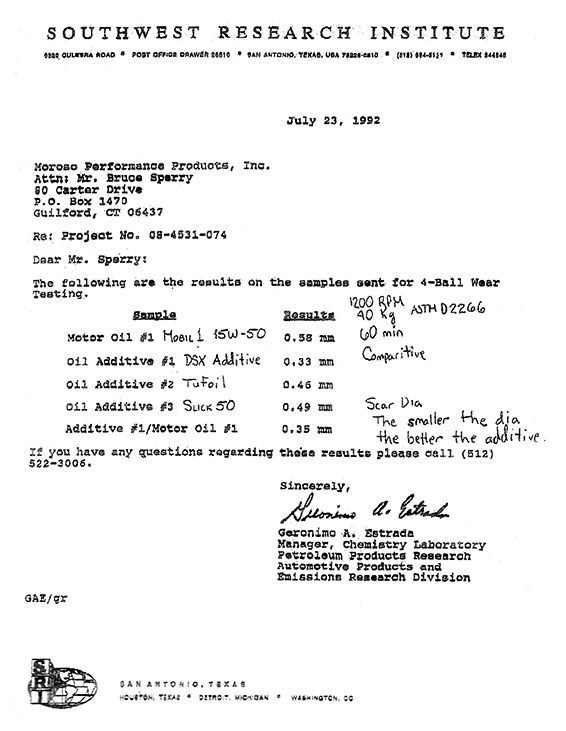
In this test, conducted by the Southwest Research Institute, the load was 40 kg for the one hour period at 1200 rpm.
Lubricants:
MOBIL 1- 15W50
DSX Extra
Tufoil
Slick Fifty
Mobil 1 + DSX Extra (5% by volume)
Results:
The Southwest Research Institute results are reported in the attachment to this Memo. The DSX Extra provided significant improvement in reduction. There is a measurable reduction in heat and in energy consumption – fuel and electric.
View The Original Letter Below:


